How to Read a Smart Digital Multimeter: A Beginner's Guide
Introduction:
In the world of electronics and electrical work, a multimeter is an indispensable tool that enables you to measure various electrical properties. With the advent of smart digital multimeters, the process of taking measurements has become more intuitive and efficient. Whether you're a novice or looking to upgrade your skills, understanding how to read a smart digital multimeter is a fundamental skill. In this comprehensive guide, we will walk you through the steps of reading and interpreting the measurements on a smart digital multimeter.

Step 1: Familiarize Yourself with the Multimeter:
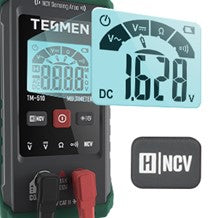
Before diving into measurements, take a moment to become acquainted with the basic components of your smart digital multimeter. It typically consists of a display screen, a rotary dial or function buttons, and input jacks for test leads. Understanding these components is crucial for accurate measurements.

Step 2: Set the Measurement Mode:
Most smart digital multimeters offer a range of measurement modes, including voltage, current, resistance, and more. To select the appropriate mode, turn the rotary dial or press the corresponding button until the desired function is highlighted on the display.
Step 3: Choose the Measurement Range:
Once you've selected the measurement mode, you'll need to choose the appropriate range. Smart multimeters often offer auto-ranging capabilities, which means they automatically adjust the range based on the detected signal. If your multimeter doesn't have auto-ranging, manually select a range that encompasses the expected measurement value.
Step 4: Connect the Test Leads:
For voltage and resistance measurements, insert the red test lead into the VΩmA (or similar) jack and the black test lead into the COM jack on the multimeter. Ensure the test leads are securely connected to the multimeter and the circuit/component you are testing.

Step 5: Take the Measurement:
With the test leads properly connected and the multimeter set to the desired mode and range, make contact with the circuit or component you want to measure. For voltage measurements, touch the test leads to the points where you want to measure the voltage difference. For current measurements, the circuit may need to be opened, and the multimeter set to the appropriate current range. For resistance measurements, connect the leads to the component under test.
Step 6: Read and Interpret the Display:
The smart digital multimeter's display will show the measured value in the chosen unit (volts, amps, ohms, etc.). Some multimeters also offer additional features like hold functions, backlighting, and data logging. Ensure you understand the unit of measurement and any additional features displayed on the screen.

Step 7: Record and Analyze:
After obtaining the measurement, record the value for future reference or analysis. If necessary, compare the measured value to expected or reference values to assess the health of the circuit or component.
Step 8: Safely Disconnect and Power Off:
When you're finished with your measurements, turn off the multimeter and disconnect the test leads from the circuit. This helps ensure your safety and the longevity of the multimeter.
Conclusion:
Reading a smart digital multimeter might seem daunting at first, but with practice and a clear understanding of its basic functions, you can confidently and accurately measure various electrical properties. By following these steps and referring to your multimeter's user manual, you'll be well on your way to becoming proficient in using this essential tool for electronics and electrical work.

